Creating a Field of Drifting Gabors
This Psykinematix tutorial shows how to create a field of drifting Gabors using the "Multi-Elements" panel.
Step 1: Creating the Experiment Hierarchy
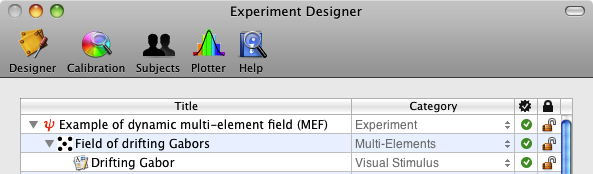
First, create the above events hierarchy in the "Experiment Designer" panel (see the "Contrast Sensitivity: Lesson 1" or "Orientation Discrimination: Lesson 1" tutorial to learn more about how to create this events hierarchy). The hierarchy specifies an experiment that simply shows a field of multi-elements composed of drifting Gabors. The events still need to be customized in terms of spatial and temporal properties as detailed in the steps below.
Step 2: Creating a Gabor Stimulus
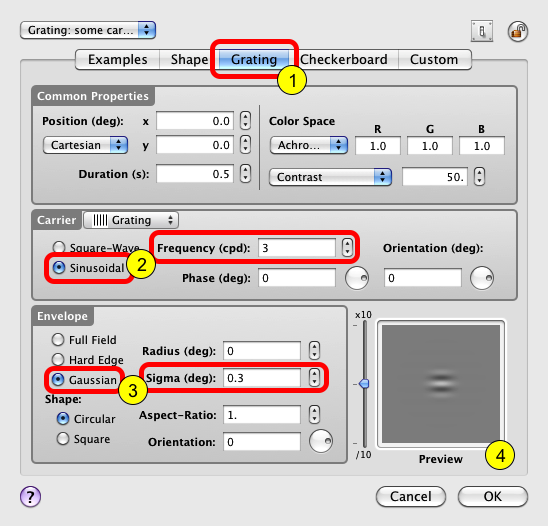
Select the "Drifting Gabor" event and click on the properties button (or Apple-i). The panel above will open. Click on the "Grating" tab to select the "Grating Stimulus" type (1). From there, you can create a Gabor stimulus by specifying a Grating carrier with a sinusoidal modulation at a given spatial frequency (2), and specifying a Gaussian envelope with a given spatial extent "sigma" (3). A preview of the specified stimulus is always displayed in the Preview box (4).
Step 3: Adding a Drifting Motion

The drifting motion of the Gabor can be created by specifying a phase of the sinusoidal carrier that changes linearly over time. To do so you can either edit directly the phase text field and enter the following expression: 360 * [TIME] / [DURATION] , or use the expression editor by control-clicking on the text field and selecting the Editor option in the contextual pop-up menu.
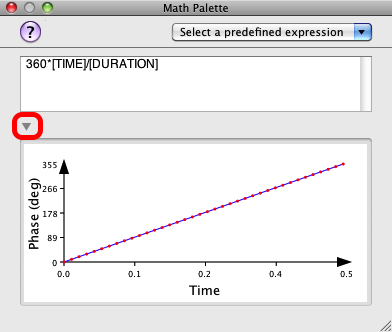
If using the editor, enter the same expression (360 * [TIME] / [DURATION]) in the text field and click on the small arrow to reveal a graphical representation of a time expression. Note that each red dot on the blue line represents the expression value for each display frame.
In the above expression, [TIME] represents the built-in time variable relative to the stimulus onset, and [DURATION] represents the built-in duration variable for the currently edited stimulus. Hence, this expression specifies a spatial phase in degrees starting from 0 at the stimulus onset to 360 at stimulus offset, corresponding to a full cycle shift for the stimulus duration. Note that the built-in variables, [TIME] and [DURATION], have to be specified in uppercase because they are system-defined variables.
Click on the "OK" button to validate the change and close the properties panel for the Gabor stimulus.
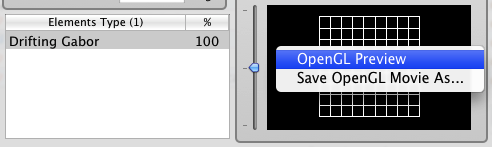
Step 4: Customizing the Multi-Element Field
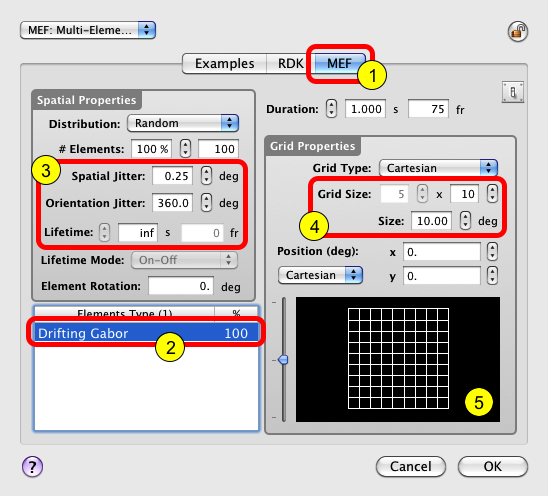
Select the "Field of drifting Gabors" event and click on the properties button (or Apple-i). The panel above will open. Click on the "MEF" tab to select the "Multi-Elements Field" type (1). From there, you can customize the appearance of the elements field composed of the drifting Gabors: select the "Drifting Gabor" in the table (2), specify the spatial and orientation jitters to apply to each Gabor element in the grid and set their lifetime to infinity (inf value), specify the grid in terms of the total number of elements and its overall size. The grid appearance is always displayed in the Preview box (5).
Step 5: Watching the Dynamic Field
You can now either run the experiment, preview the dynamic stimulus, or export it as a movie!