Orientation Discrimination: Lesson 3
You will learn how to create noise masks and use a timeline event to specify the temporal relationship between the stimuli events.
TEMPORAL MASKING
This lesson makes the basic orientation discrimination task more elaborate by displaying 2D noise masks before and after the target stimulus (aka sandwich paradigm with forward and feedback masking stimuli).
First, duplicate the original experiment and rename the copy Orientation Discrimination 3 as you did in Orientation Discrimination: Lesson 2.
Step 1: Adding a Timeline Event
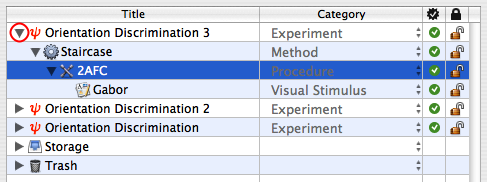
Option-click on the arrow in front of the Orientation Discrimination 3 experiment to reveal its whole hierarchy.

Select the 2AFC procedure and insert a new group event using the '+' folder icon. Set the name and category of this new event to Timeline and Composed Stimuli, respectively.

Move the Gabor stimuli INSIDE the Timeline event so it appears indented as illustrated.
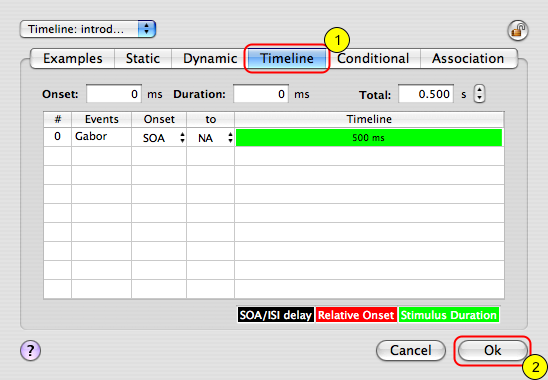
Select the Timeline event and click on the Inspect button to inspect its properties. Click on the Timeline tab to edit its settings (1).
The Timeline properties present a list of embedded stimulus events: so far there is only one, the Gabor stimulus.
Click on the OK button to close the properties panel (2). The next step is to add masking stimuli before and after the Gabor stimulus.
Step 2: Adding Masking Stimuli
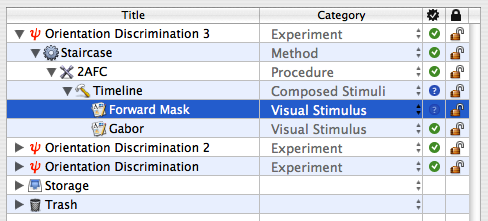
Select the Timeline event, and insert a new stimulus event using the '+' file icon. Set its name and category to Forward Mask and Visual Stimulus, respectively (or duplicate the Gabor event, rename the copy, and move it directly above the original Gabor).
Select the Forward Mask event and edit its properties by clicking on the Inspect button (or press Apple-i).
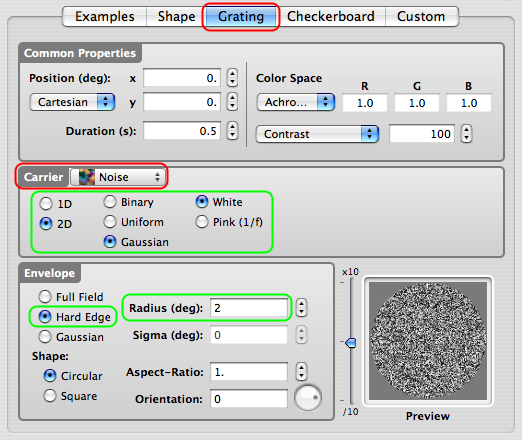
Select the Grating tab, if necessary.
Using the pop-up menu, set the carrier type to Noise; then select the 2D, Gaussian, and White noise options.
Set the envelope to Hard Edge with its radius at 2 deg (this must be larger than the sigma used for the Gabor stimulus).
Click on the OK button to validate the changes.
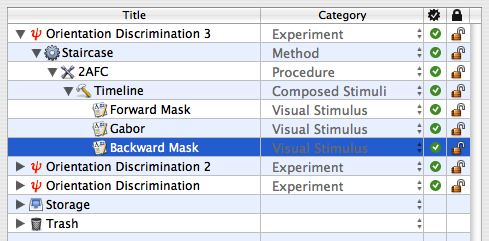
Duplicate the Forward Mask stimulus, rename the copy to Backward Mask, and move it to just after the Gabor stimulus inside the Timeline event, as illustrated.
The next step is to edit the Timeline properties to specify the temporal relationship between the masks and the target stimulus.
Step 3: Customizing the Timeline
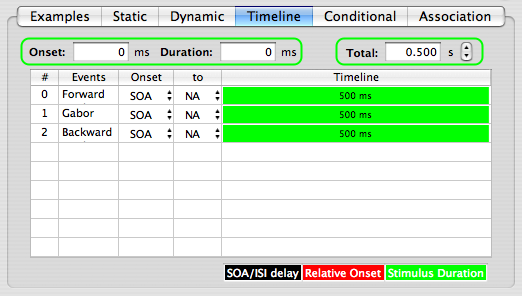
Select the Timeline event, and click on the Inspect button to edit its settings.
There are now three stimuli in the Timeline table. The green area in the table indicates when and how long each stimulus is displayed. By default and as illustrated, they are presented simultaneously for the same length of time.
Note that the total duration of the timeline, as well as the onset and duration for the selected stimulus, are indicated above the table.
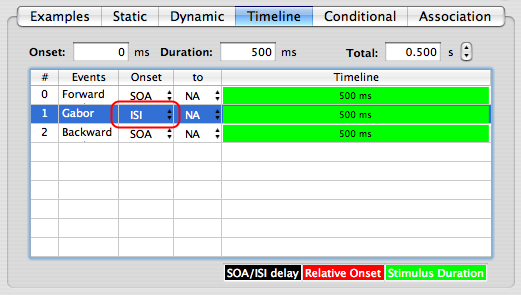
Select the Gabor entry in the table and set its Onset column to ISI using the pop-up menu (ISI = inter-stimulus interval; SOA = stimulus-onset asynchrony).
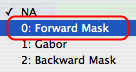
Click on NA (not available) in the to column and select the entry 0: Forward Mask from the pop-up menu. This selection ensures that the ISI for the Gabor stimulus occurs relative to the Forward Mask stimulus.
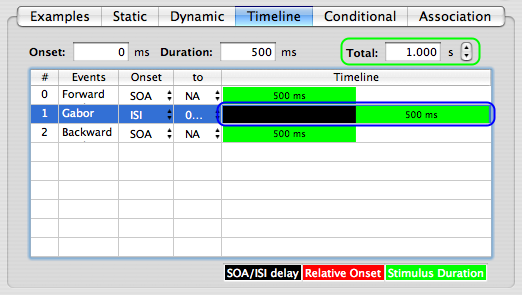
The Gabor timeline is now split in two: a black zone corresponding to the period before the ISI is applied, and a green zone during which the stimulus is displayed.
Note that the ISI onset is set to 0 ms by default which means:
- the Gabor onset occurs immediately at the offset of the Forward Mask,
- the total duration has also been automatically updated to account for the extra time introduced by the Gabor ISI relative to the Forward Mask.
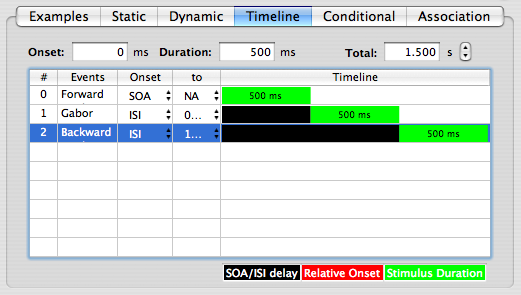
Select the Backward Mask entry in the table and set its Onset column to ISI and its to column to 1: Gabor. This specifies an ISI (of 0 ms by default) between the Gabor stimulus and the Backward Mask stimulus.
The Gabor stimulus is now embedded in a sandwich masking paradigm.
Click on the OK button to validate the changes and return to the Designer panel.
Check and run the experiment!
Conclusion
In this lesson you learned how to create noise masks and use a timeline to precisely specify the relative timing of the stimuli, particularly their presentation order through the use of an ISI.
In the next lessons, you will learn how to:
- add a spatial and temporal context (Lesson 4),
- add motion & dynamics through the use of a 1st-order drifting Gabor (Lesson 5).