
|
Multimedia Stimuli |
Psykinematix makes it possible to use multimedia content as audiovisual stimuli. These stimuli are typically stored on files on your computer hard drive and may have been generated by 3rd-party softwares. These stimuli are typically the most useful for studies in the field of cognitive neuroscience. For psychophysical experiments, it is recommended to generate visual stimuli using the powerful Psykinematix capabilities presented in the "Visual Stimuli", "Composed Stimuli" and "Multi-Element Stimuli" sections.
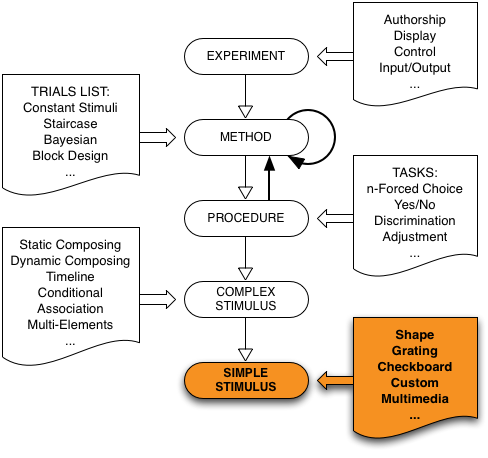
Psykinematix supports a variety of multimedia stimuli:
Text
Image
Movie
Sound
These multimedia stimuli can even be combined with other types of visual stimuli using Timeline Composing.
To create a multimedia stimulus, create a new event in the "Experiment Designer" window, set its kind to "Multimedia", and display its properties by clicking on the "Info" icon (or press ⌘I). Once a multimedia stimulus has been selected, changing it by clicking on other tabs is disabled unless the Control key is pressed simultaneously. This is to prevent accidental changes because stimulus settings are then reset to default.
For the four types of multimedia listed above, it is possible generate a list of such stimuli for each "Multimedia" event created. A preview of the multimedia entry currently selected in the list is always available. Note that since image, movie and sound stimuli are imported from multimedia files stored on the computer hard-drive, it is important to make sure that these files are not moved from their original location, otherwise these files would be reported as missing in the list table ("not found"). This problem can be solved by restoring the files to their original location or control-clicking the "+" button to select the folder where these files have been moved to.
When specifying a list of text, image, movie or sound stimuli, one has also to indicate how the actual stimuli are selected for each presentation trial using the Selection pop-up menu:
All Simultaneous: all stimuli present in the list are presented simultaneously, each having its own size and position.
Sequential: a single stimulus is chosen from the list in the indicated order (top to bottom).
Reverse Sequential: a single stimulus is chosen from the list in the reverse order (bottom to top).
Random w/o repeat: the list is randomized just once, and a single stimulus is chosen in a sequential order until all stimuli have been selected, after which the selection follows the same order.
Random & reshuffle: Same than "Random w/o repeat", except the list is randomized again after all stimuli have been selected.
Random: a single stimulus is randomly chosen from the list.
Text stimuli can be added or removed from the list, or even reordered using drag and drop. One can specify font, size, color, position, and duration for each text entry. These properties can be assigned to a group of entries by selecting all of them and then changing their properties. Position specifies the Cartesian or polar coordinates (in degrees of visual angle) of the text center relative to the display center. Text entries can also be imported from a file containing one entry per line. For a list of text entries, Selection should be specified as described above.
It is important to note that when specifying the text size using the font browser, the character height is automatically converted in degrees of visual angle using the geometry calibration for the current display (selected in the Display section of the experiment properties or in the Display preferences by default). Reciprocally, when specifying the character height directly in degrees the size of the selected font is converted into pixels.
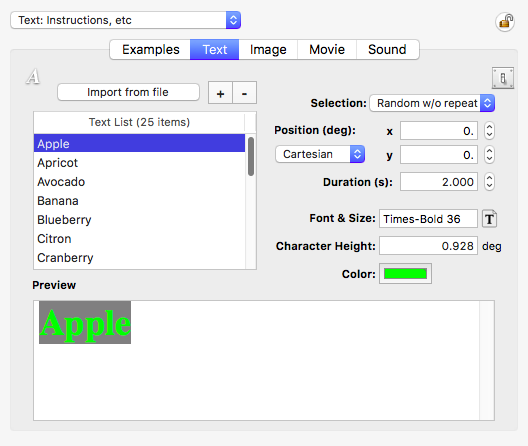
Note: You may refer to the tutorial Visual Acuity as it heavily uses Text Stimuli as optotypes.
Image stimuli can be added or removed from the list, or even reordered using drag and drop. One can specify size and position for each image entry. Each entry in the displayed list consists of the image filename and its original size expressed as width and height in pixel units. If the file corresponding to the entry cannot be found on the disk (because it has been moved to another location), the size information is replaced with an error message.
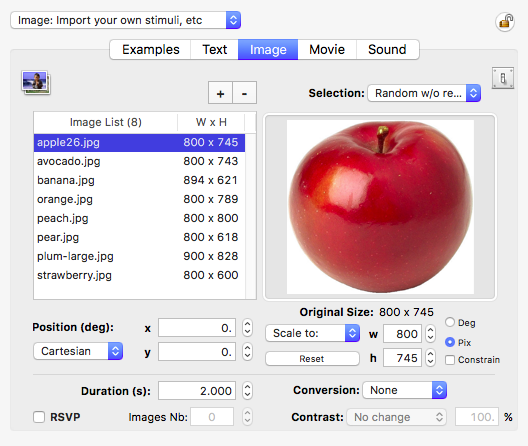
Position specifies the Cartesian or polar coordinates (in degrees of visual angle) of the rendered image center relative to the display center. The size of the rendered image is specified either in degrees or pixel units. Its width and height (w,h) can be specified independently or constrained to maintain the same aspect ratio as the original image when the "constrain" box is checked. The "Reset" button resets the size of the image to the original values in pixel units. The same position and size properties can be assigned to a group of entries by selecting all of them and then changing their properties. For a list of images, Selection should be specified as described above.
All other properties below the horizontal separator (that is duration, conversion and contrast) are common to all images. The RSVP check box specifies whether the images presentation should follow a "Rapid Sequential Visual Presentation": when checked, "Images Nb" indicates the number of images that are part of the sequence (selected according to the Selection option), and the total duration of the sequence is then the sum of each image duration. The Conversion pop-up menu indicates whether the images should be converted (for example to grayscale) with the option to perform some Contrast normalization at a specified level:
Weber normalization: the normal version is appropriate when the pattern to apply the contrast to is on a white or black background, the 'Dark' version when the pattern to apply the contrast to is darker than the specified background, the 'Light' version when the pattern to apply the contrast to is brighter than the specified background. The specified background refers to the background color specified in the Experiment Display properties or the clear screen color under the Onset Control Settings. For example if the images are black optotypes on a white background but one wants to apply the contrast to the black optotypes relative to a specified grey background, the 'Dark' option should be used. Note that the sign of the contrast can then be used to indicate whether the optotypes should be darker or brighter than the specified background.
Image formats supported by Psykinematix are: TIFF, PNG, JPEG, and GIF.
Movie stimuli can be added or removed from the list, or even reordered using drag and drop. One can specify size and position for each movie entry. Each entry in the displayed list consists in the movie filename, its original size expressed as width and height in pixel units, and the number of frames that composes it. If the file corresponding to the entry cannot be found on the disk (because it has been moved to another location), the size information is replaced with an error message.
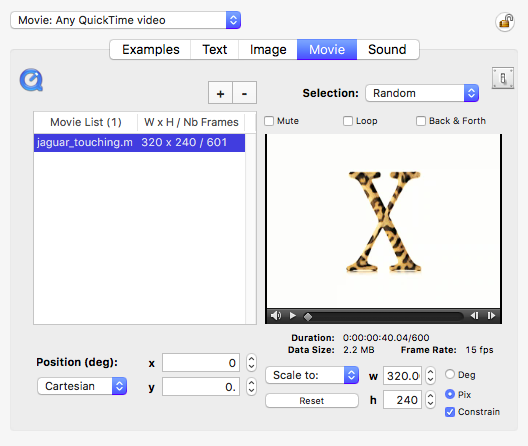
Position specifies the Cartesian or polar coordinates (in degrees of visual angle) of the rendered movie center relative to the display center. The size of the rendered image is specified either in degrees or pixel units. Its width and height (w,h) can be specified independently or constrained to maintain the same aspect ratio as the original image when the "constrain" box is checked. The "Reset" button resets the size of the image to the original values in pixel units. The same position and size properties can be assigned to a group of entries by selecting all of them and then changing their properties.
The actual duration of the movie (in the day:hour:min:sec:frame format) is indicated below the preview window along with the data size and the frame rate (frames per second). Above the preview window, the "Mute" check box specifies whether the audio track of the movie should be muted, and two other mutually-exclusive check boxes specify whether the movie should be played in a loop or continuously back and forth.
For a list of movies, Selection should be specified as described above (note that "All Simultaneous" is not yet supported for movies).
Movie formats supported by Psykinematix are: MOV, AVI, and MP4.
To play AVI files, you may need to install additional free codecs from Flip4mac (https://www.flip4mac.com/).
Sound stimuli can be added or removed from the list on the left-hand side of the panel, or even reordered using drag and drop. Each entry in this list consists of the sound filename and its duration (in the day:hour:min:sec:frame format). If the file corresponding to the entry cannot be found on the disk (because it has been moved to another location), the duration information is replaced with an error message. The slider on the bottom left-hand side specifies the volume to be used to during the sound playback. The same volume can be assigned to a group of entries by selecting all of them and then changing their volume.
For a list of sounds, Selection should be specified as described above (note that "All Simultaneous" is not yet supported for sounds).
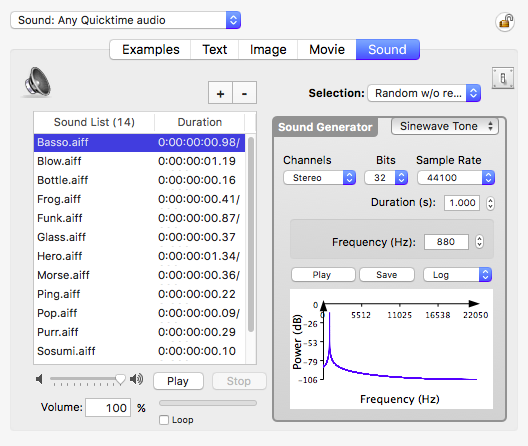
The right part of the panel consists of a rudimentary sound generator that allows the creation of pure tones (sine wave tone) or noise (white or pink) with a graphical representation of the sound power level in decibels. The created sounds can either be played or saved, and should ideally be stored in ~/Library/Application Support/Psykinematix/Sounds/.
Sound formats supported by Psykinematix are: AIFF, WAV, and MP3.
© 2006-2024 KyberVision Japan LLC. All rights reserved.